
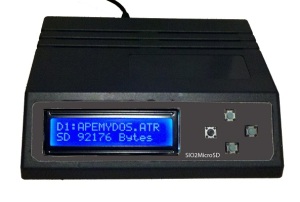
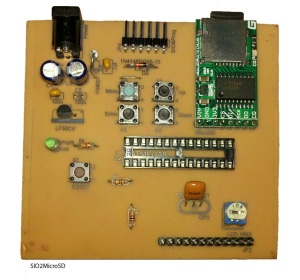
Created for the Atari 8 bit computer family to use as a replacement for the Atari 810/1050 drives. An Arduino board was used as the platform as it is widely available, affordable and fun to use.
Features:
- 4 Virtual Drives (D1:-D4:)
- Supports standard SD/ED/DD ATR files
- Up to 4 sub-directories under the Atari sub-directory
- High Speed SIO *
- Load/Unload/Swap with 4 buttons and 16×2 LCD Display
- Optional “Game/Simple Mode” configuration to limit menu choices for easier use
- LCD detail mode to view access commands and use
- XEX Boot-Loader **
- Ability to save current configuration of all settings
- S-Drive main functions compatible ***
- Full board version has built-in USB to update firmware or use as SIO2PC device
- Because it is based on the Arduino, the hardware configuration options are limitless
Documentation
SIO2uSD Documentation 12-31-12Video Demo
A video showing some of the features can be seen on YouTube. Please excuse the enclosure. It is my personal prototype. 🙂
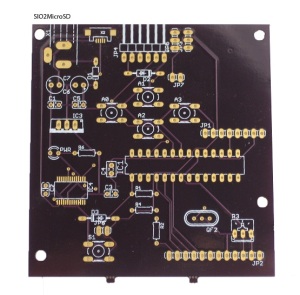
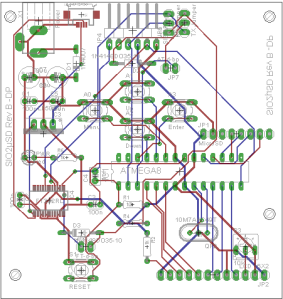
Full PCB & Schematic
Check out my prototype boards page also.
A test run of boards were done by OSH Park. The quality was outstanding. I rushed to get these out and made a few design mistakes. The LCD header is backwards. I use header cables, so not a huge deal. The power barrel holes are too small as well. Let’s not pay attention to the silk screen text on the back of the board being inverted.

“Home-Made” Prototype PCB
If you would rather take on the challenge of making your own PCB, here is a version I designed that allows for a one-sided circuit board that can be made at home!
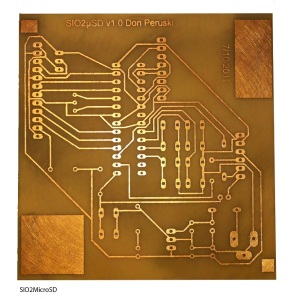


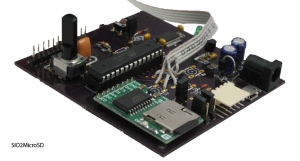
While creating the software, I ran this 100% on a breadboard. If you have an Arduino, this doesn’t take too long to wire up.
Hex Code for Arduino
Due to the limitations of this hosted website, the file below should be copied and pasted to a clean plain text file so that it is re-converted back to what it will see as an Intel Hex file. I suggest doing a copy/all and then pasting into something like Notepad so no formatting will be introduced. You can than save it as a .hex file.
Download Latest SIO2MicroSD v1.1-hex
Version 1.1 Fixes 2-1-2015:
– ATR images of 16 meg not working properly
– SDrive directory lists of more than one page missing an entry per page
– SDrive root directory selection on last entry was invalid
Download Older Version 1.0
You can run AVRDude to upload this file to your Arduino device. This software is included with the free download from their site. Here is an example line to use if you own an Arduino with an ATMega 328P IC and it is located on COM3.
avrdude -V -F -C avrdude.conf -p m328p -c stk500v1 -P COM3 -b 57600 -U flash:w:sio2microsd.hex -vI suggest running Arduino version 022 as that is what this device was built on:
http://arduino.cc/en/Main/OldSoftwareReleases
Make sure all the files are in the same directory to make it easy. Here is the pin setup for the Arduino:
/*
* Menu Button A0
* Up Button A1
* Down Button A2
* Enter Button A3
* LCD Connections *
* LCD RS pin to digital pin 7
* LCD Enable pin to digital pin 6
* LCD D4 pin to digital pin 5
* LCD D5 pin to digital pin 4
* LCD D6 pin to digital pin 3
* LCD D7 pin to digital pin 2
* LCD R/W pin to ground
* Atari Connections *
* Atari SIO Pin 4 or 6 Black to Arduino GND
* Atari SIO Pin 5 Green to Pin 0 TX (PD0)
* Atari SIO Pin 3 Orange to Pin 1 RX (PD1)
* Atari SIO Pin 7 Violet to Pin 8 Digital Input (PB0)
* SD Card Pinout *
* Pin 10 CS (be sure to protect to 3.3v)
* Pin 11 DI (be sure to protect to 3.3v)
* Pin 12 DO
* Pin 13 SCK (be sure to protect to 3.3v)
*/
History
- January 2011 received Arduino and parts to start experimenting
- Feb 2011 had SIO routines partially working
- March 2011 finished main program
- July 2011 created first PCB using Eagle and toner etching
- Decided on name SIO2MicroSD – Was SIO2Arduino
- August 2011 had PCB made professionally
- August 2011 started adding SDrive functions to code
- September 2011 code cleanup and refinement
- September 2011 added XEX loader to code
- December 2012 created documentation and blog
References
Contact
Please contact me for availability of parts or more info. I started revising the board and could make a run if enough people are interested. For a completed board with no case, I believe it would run around $50-$60. You can send a reply at the bottom of this page. You can also send an email to my gmail account – TheDiskwiz.

Pingback: Arduino - SIO2MicroSD.
Hey there. Me again. 😉 I finally found someone who can help me flash the ATM and he is asking for the proper fuses setting for AVRDude. Could you please shed some light on this? Thanks alot.
Hi Diskwiz,
this is a nice piece of work!
A friend asked me to burn an atmega328P with the sio2microsd1.hex. Any clue which fuse values must be used? Curently the chips fuses are set as follows: hfuse=0xda, lfuse=0xff and efuse=0x05. Will this work?
Thanks and best regards!
Sascha
Thank you. I believe you want h=0xda l=0xff e=0x05, just as you stated. I use the tools that come with the Arduino software to write the hex and have not had to change the fuse settings.
Can I just use a arduino uno alone with a sd card reader, flash the hex code and it would work or not?
As long as it is using the standard Arduino boot loader, you should be fine.
Hi Diskwiz,
I repeated the scheme on Arduino (DFRduino RoMeo) but when I run the error “SD Error !”.
LCD, menu and buttons work. A similar project after adaptation, works:http://www.whizzosoftware.com/sio2arduino/index.html
Could you shed some light on this or send me the source code?
Thank you very much.
The SIO2Arduino has a different pinout configuration from SIO2MicroSD. This could very well be your issue.
I am having problems uploading the hex file to an atmega328p, it seems too big. Can you check the file size?
It should not be too big. I originally wrote this for a 328p chip. Try using all of the utilities and binaries from the Arduino022 version and let me know if that helps.
Hi Don,
I would definitely be interested in an unpopulated PCB if you have any more. I have an old Atari 800 I would love to get this going for.
Thanks,
Anthony
Where are you located, Anthony?
Hi, I am also about to build this and would be very keen to get an unpopulated PCB if any are still available, I am in Australia. Please send me a note: atari(at)chrisharrison(dot)com(dot)au
I’m more than happy to pay for the board and shipping costs.
Thanks,
Chris
Sorry. There are no more boards available.
how do I do to write everything inside arduino?
thj
Hello Carlo, The source is not supplied. You will need to use the command line I have on my site to write the hex file to your arduino chip.
Hello.
I have downloaded the sio2sdmicrosd1-1-hex.docn file I opened the doc file that you copied to a text file and named sio2sd.HEx
then with xloader I wrote the file into my Arduino one,
I feed Arduino but only squares appear on the screen.
why is this happening?
thank you
Hello Carlo,
I have not used xloader. If you are not seeing anything on your LCD screen, it could be the wiring, or the hex code did not load properly. Even if the SD or SIO is not working, you would get something on the display. Have you powered it up with no SD card in to test? Please leave me more detail. I would be happy to try and help. I would strongly recommend attempting to load the hex using the method I describe on my site, with the Arduino 022 utils, to be safe.
I thank you for the answers.
I understood the cause was not working.
I used Arduino Nano, the hex file was compiled for the Arduino one
right?
excuse me many questions 🙂
how can I change the hex file to adapt it to Arduino Nano?
thank you
sorry for my English I use online translator
You are correct, Carlo. In version Arduino 022, there is no Nano option as it did not exist at that time. I cannot re-create the HEX file for that chip. I would have to update my code to work in the newer versions of the Arduino IDE.
thank you so much I am going to use Arduino one.
I understood that to have a hex file for arduino nano should take the original code and recompile for Arduino Nano.
right?
I saw that to make the sd2arduino, I have to turn sd2arduino select the game and then turn on the atari
with your sd2microsd I should do the same procedure?
this is my sd2arduino 🙂
if I can not post videos. I apologize to you
Looks good! You are correct. If you do not have an image selected, it will act like there is no drive. Just make sure you exit the menu so that it does not say “Drives Offline” and you will be fine. You can save your drive settings so that when you power down, it will come back up in the same state also.
Also, if you boot an sdrive image, my software is compatible with it as well.
I insert the sd2 in atari.
I will feed him sd2 directly from atari feeder.
Thank you for your answe
how to speed up the loading?
I have read that I can burn the rom with fast loader.
I can also insert resistance in atari
right?
thank you
The best way to do this is to burn your OS ROM with a HISpeed loader. Check out the ROM I shared on this thread, post #6.
http://atariage.com/forums/topic/206880-130xe-reverse-option-key-for-basic/
thank you very much
You’re very kind.
I will burn EPROM my xe / gs with your os.
I have to change the rom of the games to load them quickly?
thank you
Os+basic+missile combat?
I assemble your os basic but what should I add?
Rev. A, Rev. B, rev c?
thank you
I believe the rom I posted on the forum had Basic C included. I just wanted to have basic OFF by default instead of ON.
the rom you posted do not think has the basic.
because the rom is 16k, the Roma xegs and 32k, 16k ,,,, os + 8k basic + 8 k missilecommand.
I have created a rom with your os + basic + missile but the screen remains red. I have tried other basic, but the screen and always red.
thank you
I just double-checked, and the one I am using has basic included, but you have to hold down option to activate it. Could be that something got changed on the site, as I have not checked the post in a long time.
I would like to make a simpler version, that I could build inside the Atari without to much modification to the case. So would this work without the LCD and buttons? if it would then I would only need to modify the case to access the SD card.
thanks
If you set Drive #1 up for the S-Drive ATR, my application is compatible with it. You can then control what you load via the Atari. I suggest burning your Atari ROM with a high-speed SIO routine and I changed my 130XE to default boot without BASIC. You will want to hook up the LCD to do initial settings. I had considered locking down the code for an S-Drive only mode for this purpose.
Hi there, nice work! Just one question : is there any chance to have long file names displayed? It would be a great enhancement, since it is really difficult to find the correct games if the names are truncated. Please, let me know. 🙂
Sorry I missed this comment. Not at this time. I know it can be a pain. It would take more code, and believe me, that little chip is at about 100%. I had to work all kinds of tricks to get all of those options to fit in such a small version of the Atmel processor.